

By The Hazli Family — Peter & Louise · Reviewed June 2026
Quick answer: Repair a camp mattress by locating the leak first — inflate fully and spray soapy water, watching for bubbles. Clean an area one inch beyond the hole with rubbing alcohol, let it dry, apply adhesive and a slightly oversized patch, smooth out air bubbles, cure 6–8 hours, then re-inflate and test for hissing.
Even one small puncture can turn a peaceful night in the great outdoors into a chilly, uncomfortable ordeal. Up to 50 percent of campers report gear failures like mattress leaks during overnight trips. A reliable camp mattress is key to enjoying any adventure, which makes knowing how to spot and repair damage a crucial skill. This guide puts practical repair steps into your hands, so you never have to cut a trip short over a sneaky leak or soft spot.
Table of Contents
- Step 1: Gather Essential Repair Materials
- Step 2: Identify and Locate Mattress Leaks
- Step 3: Clean and Prepare the Damaged Area
- Step 4: Apply Patch or Sealant Effectively
- Step 5: Test the Repair for Air Tightness
Quick Summary
| Key Point | Explanation |
|---|---|
| 1. Gather essential repair materials | Have a compact kit with items like Tenacious Tape and safety pins to enable effective repairs on the go. |
| 2. Identify and locate mattress leaks | Inflate your mattress and use soapy water to find leaks; mark them for easy repair reference. |
| 3. Clean and prepare damaged areas | Use rubbing alcohol to clean the area around the leak, ensuring no dirt interferes with patch adhesion. |
| 4. Apply patch or sealant effectively | Use an appropriately sized patch and adhesive; smooth it down to avoid air bubbles for a durable repair. |
| 5. Test the repair for air tightness | After patching, fully inflate the mattress and check for air leaks to confirm successful repair before use. |
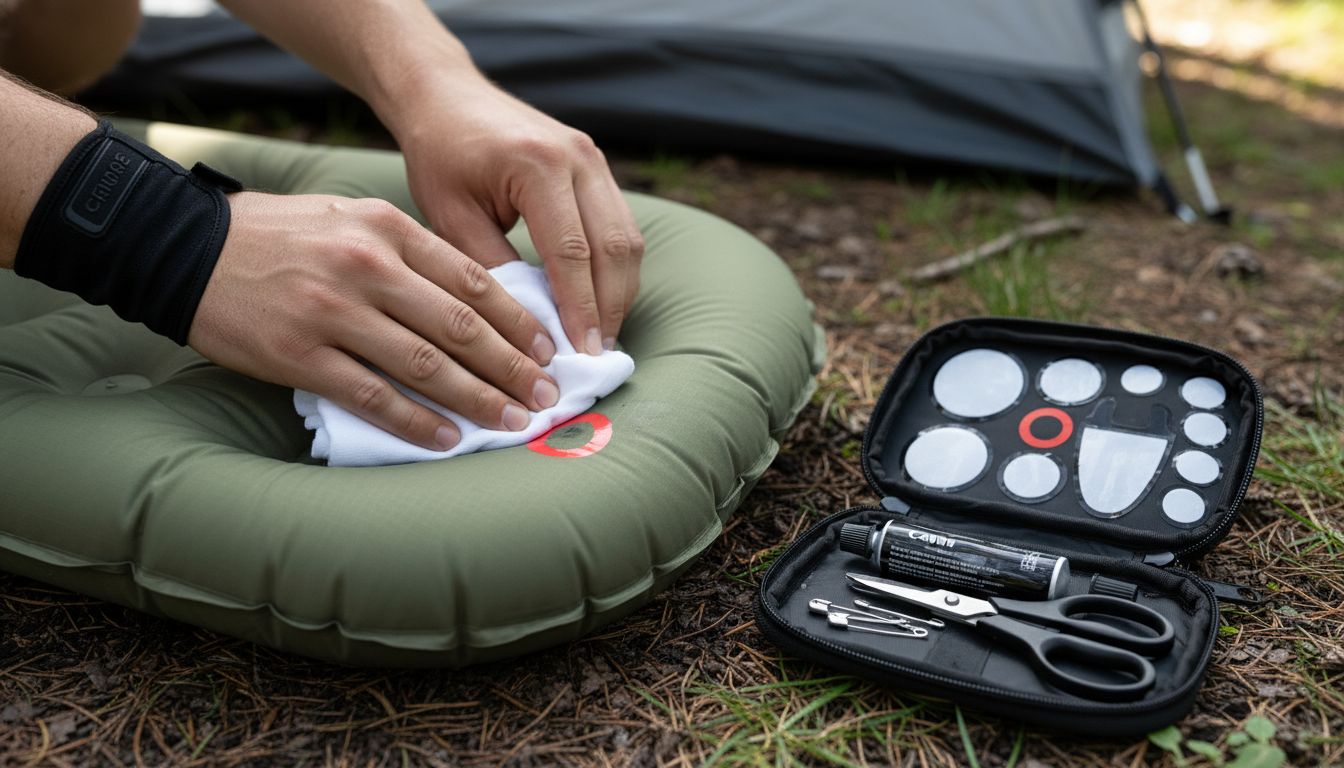
Step 1: Gather Essential Repair Materials
Before diving into camp mattress repair, you need a strategic collection of materials that will transform you from a frustrated camper to a gear repair pro. According to Washington Trails Association, smart outdoor enthusiasts prepare a compact repair kit that can handle unexpected equipment challenges.
Your repair arsenal should include key items that offer maximum versatility. Start with these critical tools:
- Tenacious Tape (waterproof and incredibly strong)
- Safety pins of various sizes
- Needle and dental floss (for robust emergency stitching)
- Rubber bands or hair ties
- Small scissors
- Rubbing alcohol (for cleaning repair areas)
- Patch kit specific to your mattress material
As Repair Café recommends, having patches and adhesive ready can save your camping experience when unexpected tears or punctures occur. Pro tip: Always test your repair materials at home before heading out to ensure you understand how they work and can apply them effectively in the field.
With these materials gathered, you are now prepared to tackle almost any camp mattress repair scenario that comes your way. The next step involves carefully assessing the specific damage to your mattress and selecting the right repair approach.
Step 2: Identify and Locate Mattress Leaks
Finding a leak in your camp mattress can be the difference between a comfortable night under the stars and a frustrating deflation. According to Sleep Foundation, there is a reliable method for pinpointing those sneaky punctures that can ruin your outdoor sleeping experience.
Start by fully inflating your mattress to its maximum capacity. This tension helps reveal even the smallest breaches. Next, prepare a simple leak detection solution by mixing mild dish soap with warm water in a spray bottle. As recommended by Washington Trails Association, systematically spray the soapy mixture across the entire mattress surface, paying special attention to seams, valves, and areas that have experienced more wear.
Watch carefully for bubbles forming anywhere on the mattress these are definitive signs of air escaping. Small bubbles indicate tiny pinhole leaks, while larger bubble formations suggest more significant damage. Mark each leak location with a small piece of tape or a visible marker so you can address them precisely in the next repair stage.
Pro tip: Perform this leak detection in a well lit area or during daylight to make spotting bubbles easier. If you cannot immediately find the leak, try rotating and carefully examining the mattress from multiple angles. Check out our guide on outdoor mattress care for additional maintenance insights that can help prevent future punctures.
With the leaks identified, you are now ready to move on to the actual repair process and restore your camp mattress to its full sleeping potential.
Step 3: Clean and Prepare the Damaged Area
Preparing the damaged area is a critical step that can make or break your mattress repair success. According to Sleep Foundation, proper cleaning ensures that your repair materials will adhere effectively and create a lasting seal.
Begin by gathering your cleaning supplies: rubbing alcohol, clean lint free cloth, and cotton swabs. As recommended by the Sleeping Institute, use rubbing alcohol to thoroughly clean a circular area approximately one inch larger than the leak you identified. Gently but firmly wipe the area to remove any dirt, oils, or residue that could prevent the patch from bonding properly.
Allow the cleaned area to air dry completely before applying any repair materials.
 This means waiting about 3 to 5 minutes after cleaning to ensure the surface is totally dry and free from moisture. Use a cotton swab for precision cleaning around small or hard to reach leak areas, making sure you remove every speck of dirt that might compromise the repair.
Pro tip: Work in a well ventilated area and avoid touching the cleaned surface with your fingers to prevent reintroducing oils or dirt. Check out our complete camp mattress care guide for additional maintenance strategies that can help you prevent future damage.
With the area meticulously cleaned and prepared, you are now ready to apply the repair patch and restore your camp mattress to its original comfort and reliability.
Step 4: Apply Patch or Sealant Effectively
Repair time is crucial for restoring your camp mattress to its full potential. According to Sleep Foundation, applying a patch requires precision and patience to ensure a durable and reliable fix.
Begin by selecting the right repair kit for your mattress material. As recommended by the Sleeping Institute, a vinyl pool repair kit works well for most camping mattresses. Cut your patch slightly larger than the damaged area about one inch beyond the leak on all sides. Apply a thin even layer of adhesive directly over the cleaned leak area, making sure to spread it smoothly without creating air pockets.
Carefully place the patch over the adhesive, starting from one edge and smoothing it down to prevent any air bubbles from forming underneath. Use firm consistent pressure to ensure complete contact between the patch and the mattress surface. Allow the repair to cure completely this typically takes about 6 to 8 hours depending on the specific repair kit and environmental conditions.
Pro tip: Work in a well ventilated area with consistent temperature to help the adhesive bond properly. Explore our outdoor mattress care guide for additional maintenance strategies that can help prevent future damage and extend your mattress lifespan.
With the patch applied and cured, you are now ready to test your repair and ensure your camp mattress is ready for your next outdoor adventure.
Step 5: Test the Repair for Air Tightness
The moment of truth has arrived to validate your camp mattress repair skills. According to Sleep Foundation, properly testing your patch is crucial to ensure a reliable and comfortable sleeping surface during your outdoor adventures.
Begin by fully inflating the mattress to its maximum capacity. Wait approximately 30 minutes to an hour to check if the repair holds under consistent pressure. As recommended by the Sleeping Institute, systematically apply gentle pressure across the patched area and listen carefully for any subtle hissing sounds that might indicate air escaping. Run your hand slowly over the repaired section to feel for any unexpected air movement or temperature changes that could signal an imperfect seal.
If you detect any signs of air leakage, do not panic. Simply mark the area and repeat the cleaning and patching process with extra attention to removing air bubbles and ensuring complete adhesion. Some repairs might require multiple attempts to achieve a perfect seal.
Pro tip: Perform your final test in a quiet environment where you can easily hear even the smallest air leak. Check out our comprehensive outdoor mattress care guide for additional maintenance strategies that can help you prevent future damage and extend your mattress lifespan.
With a successful air tightness test completed, you can now confidently pack your restored camp mattress for your next outdoor expedition.
![]()
Restore Comfort and Confidence for Your Outdoor Sleep
Damaged camp mattresses can quickly turn a peaceful night into a frustrating experience. If you have encountered leaks, tears, or loss of air pressure, you know how important it is to find a lasting solution that brings reliable comfort back to your adventures. Instead of spending time and energy on temporary fixes, consider exploring high-quality options designed to provide durability and restful sleep wherever you go.

Discover the difference with Hazli Collection, where our premium outdoor and camping mattresses are crafted to resist wear and tear while ensuring cozy support night after night. Whether you want to avoid repeated repairs or are ready to upgrade your gear, visit our site and explore products tailored for campers and outdoor enthusiasts who value comfort and reliability. Take the next step now by exploring our full range and enjoy enhanced performance on every trip.
Frequently Asked Questions
How do I gather materials for camp mattress repair?
To gather materials for camp mattress repair, you need items like Tenacious Tape, safety pins, adhesive patches, and rubbing alcohol. Start by assembling these tools in a compact repair kit to ensure you’re ready for unexpected leaks or damage while camping.
How can I locate leaks in my camp mattress?
To locate leaks in your camp mattress, fully inflate it and spray a mixture of mild dish soap and warm water over the surface. Look for bubbling, which indicates escaping air, and mark these areas for repair.
What cleaning steps should I take before applying a patch?
Before applying a patch, clean the damaged area with rubbing alcohol and a lint-free cloth to remove dirt and oils. Ensure you clean a circular area approximately one inch larger than the leak and let it dry completely to ensure a strong bond.
How do I apply a patch to my camp mattress effectively?
To apply a patch, cut it slightly larger than the damaged area and apply a thin layer of adhesive over the cleaned area. Firmly press the patch down to eliminate air bubbles and let it cure for 6 to 8 hours for maximum effectiveness.
How can I test if my mattress repair is air-tight?
To test for air-tightness, fully inflate the mattress and wait for 30 minutes. Apply gentle pressure to the patched area while listening for any sounds of air escaping to ensure a reliable seal.
What should I do if my repair doesn’t hold?
If your repair doesn’t hold, mark the area and repeat the cleaning and patching process, focusing on eliminating any air bubbles. A perfect seal may require multiple attempts, so be patient and meticulous with your repairs.
Recommended
- Complete Camp Mattress Cleaning Guide for Outdoor Comfort – Hazli Collection
- Essential Memory Foam Mattress Setup for Outdoor Comfort – Hazli Collection
- Essential Outdoor Mattress Care Instructions for Comfort – Hazli Collection
- 7 Outdoor Sleeping Arrangement Ideas for Ultimate Comfort – Hazli Collection