

By The Hazli Family — Peter & Louise · Reviewed June 2026
Quick answer: Repair camping gear in five steps: inspect every item for tears, bent poles, and failing zippers; assemble a kit with duct tape, patches, seam sealant, and a multi-tool; clean and dry damaged areas with mild soap; apply the right fix — patches for tears, sleeves for poles, sealant for seams; then stress-test before your trip.
Every American camper has faced the sinking feeling of discovering a torn tent or a broken zipper just before a trip into the wilderness. Reliable gear is the foundation of outdoor comfort, and knowing how to tackle wear and tear is key to keeping every adventure stress-free. This guide gives you a step-by-step approach for assessing, cleaning, and repairing equipment, so you can keep your family safe and enjoy every moment outdoors with practical repair strategies.
Table of Contents
- Step 1: Assess Damage To Camping Gear
- Step 2: Gather Essential Repair Materials
- Step 3: Clean And Prepare Damaged Areas
- Step 4: Apply Effective Repair Techniques
- Step 5: Test And Verify Gear Functionality
Quick Summary
| Key Point | Explanation |
|---|---|
| 1. Thoroughly Inspect Gear Before Use | Systematically check for damage to tents, sleeping bags, and kitchen equipment to ensure safety during your trip. |
| 2. Prepare an Effective Repair Kit | Assemble essential items like duct tape, scissors, and waterproof patches to handle on-the-go repairs efficiently. |
| 3. Clean Damaged Areas Before Repairing | Ensure surfaces are free from debris and moisture to create strong bonds for repair materials and prevent further damage. |
| 4. Utilize Appropriate Repair Techniques | Choose the right methods for each type of gear damage, such as patches for tears and sealants for seams, for effective repairs. |
| 5. Test Repairs Thoroughly After Fixing | Verify functionality by simulating real conditions to confirm that repairs hold up under stress and ensure safety. |
Step 1: Assess Damage to Camping Gear
Knowing how to thoroughly evaluate your camping gear for potential damage is crucial for maintaining safety and comfort during outdoor adventures. Before heading into the wilderness, you need a systematic approach to inspect every piece of equipment and identify potential wear, tear, or structural weaknesses.
Start by laying out all your camping gear on a clean, flat surface with good lighting. Carefully examine equipment for damage using a methodical process that covers all key components:
- Check tent fabric for rips, holes, or excessive wear
- Inspect tent poles for cracks, bends, or weak connection points
- Examine zippers on tents, sleeping bags, and clothing for smooth operation
- Look for fraying on straps, buckles, and attachment points
- Test waterproofing by checking for water resistance and potential leaks
Pay special attention to critical gear like sleeping bags, water filtration systems, and protective outerwear. Look for signs of stress like stretched fabric, loose seams, or compromised structural integrity that could fail during outdoor use. For technical equipment like stoves or water purifiers, test all mechanical components to ensure proper functionality.
Here’s an overview of common camping gear issues and their critical impact:
| Gear Type | Typical Damage | Impact If Unaddressed |
|---|---|---|
| Tent | Fabric tears, bent poles | Exposure to elements, collapse |
| Sleeping Bag | Ripped seams, broken zippers | Reduced warmth, discomfort |
| Water Filtration | Cracks, leaks, clogs | Unsafe drinking water |
| Outerwear | Frayed seams, loss of waterproofing | Hypothermia risk |
| Cooking Equipment | Faulty valves, cracked handles | Food preparation failure |
This table will help you prioritize inspection steps for each gear type based on risk during your trip.
A small tear or weakness can quickly become a major problem when you’re miles from help, so thorough inspection is your first line of defense.
Prioritize repairs based on the severity and potential impact of the damage. Minor cosmetic issues might be less urgent, while structural damage that compromises safety requires immediate attention.
Pro tip: Keep a small repair kit with multi-purpose tape, needle and thread, and waterproof sealant to address minor gear damage quickly during your trip.
Step 2: Gather Essential Repair Materials
Preparing a comprehensive repair kit is your secret weapon for handling unexpected gear damage during camping trips. By assembling the right tools and materials beforehand, you can quickly address issues and prevent minor problems from becoming major setbacks.
Start by collecting the essential items recommended in the camping repair kit guide. Your repair kit should include multiple versatile tools and materials that can handle various types of equipment damage:
- Heavy-duty multi-purpose duct tape
- Sharp utility scissors
- Compact multi-tool with pliers and knife
- Waterproof repair patches
- Strong needle and thread
- Small zip ties
- Lightweight repair tape
- Seam sealant or waterproofing agent
- Compact tent pole repair sleeve
Choose lightweight, compact versions of these tools to minimize added weight in your pack. Focus on materials that can provide quick, temporary fixes for tents, sleeping bags, clothing, and other critical camping gear. Consider the specific environments you’ll be exploring and pack materials suited to those conditions.
A well-prepared repair kit can mean the difference between a minor inconvenience and a potentially trip-ending equipment failure.
Organize your repair materials in a waterproof, compact bag or container that protects them from moisture and keeps everything easily accessible. Place this kit in a readily reachable pocket of your backpack so you can quickly address any gear issues that arise during your outdoor adventure.
For quick reference, here’s how different repair materials suit common camping gear repairs:
| Repair Material | Best For | Key Advantage |
|---|---|---|
| Multi-purpose duct tape | Temporary fixes, tears | Works on most surfaces |
| Seam sealant | Seams on tents, outerwear | Restores water resistance |
| Repair patches | Fabric holes, sleeping bags | Durable and waterproof |
| Zip ties | Hardware repairs, straps | Fast and strong binding |
| Tent pole repair sleeve | Bent or broken poles | Restores structural integrity |
Use this table to quickly select the optimal repair material for your specific camping gear issue.

Pro tip: Practice using your repair tools before your trip so you’re familiar with their application and can make swift repairs when needed.
Step 3: Clean and Prepare Damaged Areas
Preparing damaged camping gear for repair requires a meticulous cleaning process that ensures optimal repair adhesion and prevents further deterioration. Proper cleaning techniques are critical for creating a surface that allows repair materials to bond effectively.
Begin by gathering your cleaning supplies and following these essential steps:
- Remove loose debris with a soft brush or cloth
- Use mild soap and lukewarm water for initial cleaning
- Dry the area completely with a clean, lint-free towel
- Inspect the cleaned area under good lighting
- Avoid harsh chemicals that might damage fabric or material
For different types of gear, adjust your cleaning approach:
- Tent fabrics: Gently wash with specialized gear cleaner
- Sleeping bags: Use gentle, gear-specific detergent
- Waterproof equipment: Use specialized cleaning solutions
- Technical materials: Follow manufacturer’s specific cleaning instructions
Thorough cleaning isn’t just about appearance - it’s about creating the best possible surface for successful repairs.
Ensure the damaged area is completely dry and free from oils, dirt, or residue before attempting any repair. Some materials might require alcohol wipes or specialized cleaning solutions to create an ideal surface for patch application or sealing.
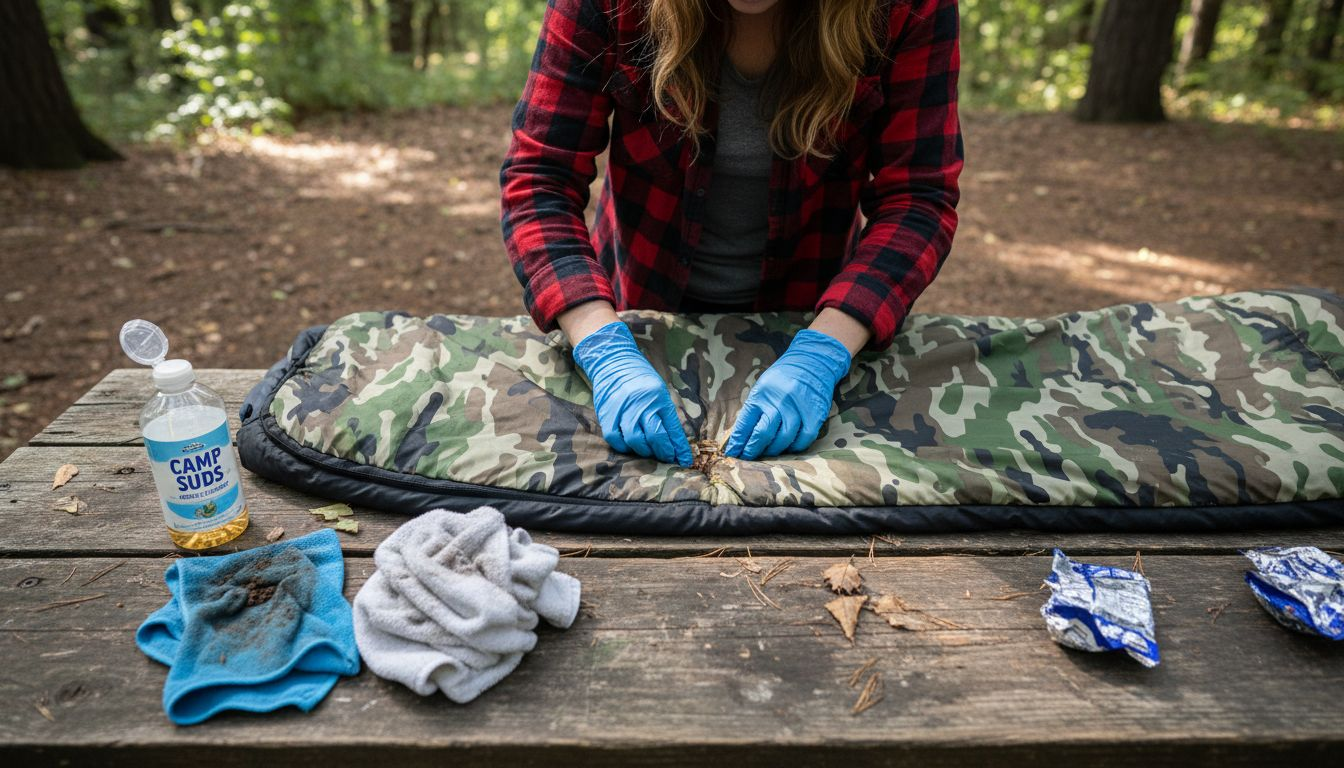
Pro tip: Test any cleaning solution on a small, inconspicuous area first to ensure it doesn’t cause additional damage or discoloration.
Step 4: Apply Effective Repair Techniques
Successful camping gear repairs require precision, patience, and the right approach for different types of damage. Outdoor repair strategies can transform a potential trip-ending equipment failure into a simple, manageable fix.
Choose your repair technique based on the type and extent of damage:
- Fabric tears: Use specialized repair patches
- Small holes: Apply waterproof repair tape
- Tent pole damage: Use pole repair sleeves
- Seam separations: Employ seam sealant or specialized adhesives
- Zipper issues: Utilize zipper repair kits
For different materials, follow specific repair approaches:
- Nylon and synthetic fabrics: Use heat-activated patches
- Canvas materials: Apply fabric-specific repair compounds
- Waterproof gear: Select waterproof repair solutions
- Technical equipment: Follow manufacturer repair guidelines
Precision in repair is more important than speed - take your time to ensure a durable fix.
Apply repair materials carefully, ensuring smooth application without air bubbles or wrinkles. Press firmly and allow adequate time for adhesives to set according to the product instructions. For complex repairs, consider using multiple techniques or reinforcement methods to guarantee long-lasting results.
Pro tip: Practice your repair techniques at home before your trip to build confidence and muscle memory for on-the-go gear maintenance.
Step 5: Test and Verify Gear Functionality
After repairing your camping equipment, verifying its functionality is crucial to ensure your safety and comfort during outdoor adventures. Comprehensive gear testing helps you identify any remaining weaknesses and guarantees your repairs will hold up under real-world conditions.
Conduct systematic tests for different types of gear repairs:
- Tent fabric repairs: Set up tent, apply stress to repaired areas
- Sleeping bag patches: Stretch and compress repair points
- Waterproof gear: Test water resistance with spray or light immersion
- Zipper repairs: Open and close repeatedly with varying pressure
- Seam sealant: Check for proper adhesion and flexibility
Follow these detailed testing steps:
- Simulate actual usage conditions
- Apply moderate stress to repaired sections
- Check for flexibility and structural integrity
- Verify waterproofing and seal strength
- Repeat tests multiple times to ensure consistency
A thorough test now can prevent catastrophic failures during your outdoor trip.
Pay special attention to high-stress areas and load-bearing repairs. Use controlled environments like your backyard or home to conduct comprehensive tests, ensuring your gear can withstand the rigors of actual camping conditions. If a repair seems questionable, consider reinforcing or replacing the item.
Pro tip: Photograph your repairs and testing process to track the effectiveness of your maintenance techniques over time.
Enhance Your Camping Comfort with Reliable Gear Solutions
Repairing your camping gear is essential to ensure durability and safety on your outdoor adventures. However, despite patching tents or fixing zippers, worn-out or uncomfortable sleeping arrangements can still disrupt your restful nights. The article highlights common issues like fabric tears, compromised waterproofing, and zipper failures that can affect your overall camping experience. If your gear has seen better days, focusing on comfortable and dependable equipment like high-quality memory foam mattresses can transform your trip, providing the lasting outdoor comfort you deserve.

Discover a range of purpose-built camping gear at Hazli Collection, designed to offer both durability and comfort. Whether you need a weather-resistant mattress or thoughtfully crafted camping accessories, our collection supports your adventure with products tested for comfort and practicality. Dont settle for temporary fixes when you can upgrade your setup to withstand the challenges of the outdoors. Visit Hazli Collection today and invest in gear that keeps you comfortable night after night while exploring the wilderness.
Frequently Asked Questions
How can I assess damage to my camping gear before a trip?
Start by laying out all your camping gear in a well-lit area. Inspect each item for rips, cracks, fraying, or other forms of wear that could affect its performance during your outdoor adventure.
What materials should I include in my camping gear repair kit?
Your repair kit should have heavy-duty duct tape, waterproof repair patches, a multi-tool, seam sealant, and a tent pole repair sleeve. Gather these materials to quickly address common gear issues, reducing downtime during your camping trip.
How do I properly clean damaged areas before making repairs?
Use mild soap and lukewarm water to clean the damaged area thoroughly, removing any debris or oils. Make sure the area is completely dry before applying repair materials to ensure a strong bond.
What are the best techniques for repairing camping gear?
Depending on the damage type, use specific techniques like applying waterproof repair tape for small holes or seam sealant for seam separations. Follow precise application instructions to create durable repairs that can withstand outdoor conditions.
How do I test the functionality of repaired camping gear?
Set up your gear and simulate actual usage conditions to test repairs. Check for structural integrity and waterproofing effectiveness by stressing repaired areas and verifying that all features function smoothly.
Why is it important to prioritize gear repairs based on severity?
Prioritizing repairs ensures that the most critical safety equipment is functional. Address structural damage immediately, while minor cosmetic issues can be deferred, helping maintain overall safety during your trip.
Recommended
- 7 Examples of Durable Camping Equipment for Outdoor Comfort – Hazli Collection
- 8 Essential Tent Camping Must-Haves for Comfort and Safety – Hazli Collection
- 7 Camping Comfort Hacks for a Great Outdoor Experience – Hazli Collection
- 7 Top Camping Gear Picks for 2025 Every Camper Should Know – Hazli Collection